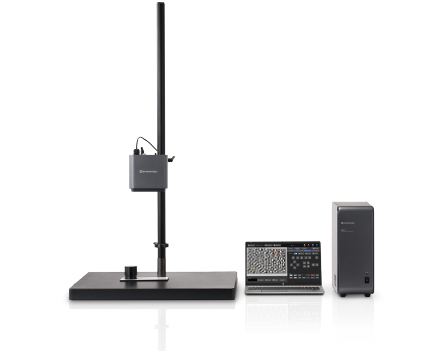
MAIVIS MIV-X – Ultrasonic Optical Flaw Detector
Go deeper/see better: new inspection technique visually reveals flaws below the surface
- Ultrasonic optical flaw detection is an advanced, new surface analysis method by Shimadzu.
- MIV-X uses this nondestructive technique to detect flaws on – and even under – the surface.
- MIV-X not only detects cracks, voids, delamination, etc.: it visually displays them.
- MIV-X also offers intuitive ease-of-use, simplicity and speed to boost lab performance.
Shimadzu, a world leader in analytical instrumentation and testing equipment, announces the European release of its new ultrasonic optical flaw detector: MIV-X. Unlike conventional ultrasonic flaw detection systems, MIV-X exposes defects both on and below the surface. The MIV-X also provides a clear visualization of any flaws detected – another improvement over conventional systems.
Distinct advantages of the MIV-X
- Improves inspection of both surface and near-surface areas
Conventional ultrasonic flaw detectors provide good results starting from 1–5 mm, whereas the MIV-X easily shifts the starting point of accurate perception to the surface. This makes it ideal for analyzing peeling of coatings. - Enlarges batch inspection area
Conventional techniques only inspect a restricted area, while the MIV-X utilizes the camera’s entire field of view to define the inspection area. This increases the observation field up to 400 x 600 mm and reduces total inspection time. - Eliminates concerns about differences in acoustic impedance
Conventional tools find the inspection of materials with different acoustic impedance challenging. The MIV-X successfully overcomes the impedance challenge and accurately detects defects in multi-material samples
MIV = make it visible
The MAIVIS-MIV-X uses a new, proprietary Shimadzu light-imaging technique to visualize hidden defects. By combining an ultrasonic oscillator with a stroboscope, the target area is subjected to both continuous ultrasonic waves and laser-light imaging irradiation. By observing the inspection area with a camera, any microscopic out-of-plane displacement of the surface or near-surface is easily and non-destructively detected by using shearography (speckle pattern shearing interferometry). From the resulting discontinuity of the ultrasonic wave, any flaws can be visualized on the display.
This ultrasonic optical flaw detection enables the visualization of internal flaws that are hard to find using conventional ultrasonic testing – up to a depth of approximately 1 mm – including peeling of the bonding and adhesive surfaces of heterogeneous materials as well as paint, thermal sprays, and coatings. And it easily detects flaws in joints and bonding surfaces in research and development processes involving multi-materials, which are created by combining different materials to increase strength and reduce weight.
Performance applications for industry and R&D
Due to its enhanced scope, depth and speed of analysis, the MIV-X offers numerous benefits for industrial and research applications in fields such as Materials, Chemicals, Electrical, Electronics, Semiconductors, Transport and Infrastructure. These include:
- Inspection of jointing in dissimilar materials
- Inspection of cracks in a base material below a film
- Inspection of adhesive surface delamination between CFRP and stainless steel
- Inspection of adhesive surface delamination between CFRP and titanium alloy
Additional high-value features
- The Noise-Removal function simplifies flaw identification and provides a clear, high-definition image of the defects.
- The Dimension Display and Marking functions streamline the identification of defect position and size, and the simple user interface and clever assists like a display scale (ruler) enable easy and explicit presentation of the results
- The optional Optical Zoom Set provides visualization of even smaller defects by decreasing the minimum detection size by a factor of approximately two (MIV-X standard: from approximately 1 mm dia. to 0.5 mm dia.). It also enables laser- optical axis adjustment, improving irradiation uniformity.
Advancing beyond conventional solutions
Shimadzu’s MIV-X Ultrasonic Optical Flaw Detector detects and visualizes cracks, voids, delamination, and other hidden defects in areas where ultrasonic testing is difficult and which are normally impossible to check visually. With the MIV-X, anyone can quickly and easily perform a visual surface and near-surface inspection. These and its other advantageous features make the MIV-X the new benchmark device for fast, accurate and easy flaw detection on the surface and below it. It’s another helpful innovation from Shimadzu.
Web summary
Shimadzu has just released the MIV-X Ultrasonic Optical Flaw Detector in Europe. Unlike conventional ultrasonic flaw detection systems, the MIV-X detects and visualizes cracks, voids, delamination, and other hidden defects in areas where ultrasonic testing is difficult and which are normally impossible to check visually. The MIV-X also provides a clear visualization of any flaws detected. With the MIV-X, anyone can quickly and easily perform a visual surface and near-surface inspection. These and its other advantages make the MIV-X the new benchmark device for fast, accurate and easy flaw detection on the surface and below it.

Figure 1: Shimadzu’s new MAIVIS-MIV-X
For further editorial questions, please contact:
Marketing Communication Europe
Shimadzu Europa GmbH
Albert-Hahn-Str. 6-10 D-47269 Duisburg, Germany
Tel.: +49 (0)203-7687410
E-Mail: shimadzu@shimadzu.eu
www.shimadzu.eu


